READ this first: KB5005413: Mitigating NTLM Relay Attacks on Active Directory Certificate Services (AD CS)
On the server where you want to install the Certificate Authority role:
open PowerShell (as Administrator):
Get-WindowsFeature | Out-GridView -PassThru | Add-WindowsFeature -Verbose*Did you know:
You can highlight specific text to execute, then press F8. This will execute only the highlighted text.
You can place the curser anywhere on any line, press F8, and the entire line will be executed.

Your results should look similar to below.
![clip_image002[5]](https://monitoringguys.com/wp-content/uploads/2020/06/clip_image0025.jpg "clip_image002[5]")
Verify that the features appear as below:
Get-WindowsFeature | Where Name -Like *adcs*
You will be prompted to configure the Certificate Services
![clip_image004[4]](https://monitoringguys.com/wp-content/uploads/2020/06/clip_image0044.jpg "clip_image004[4]")

![clip_image006[4]](https://monitoringguys.com/wp-content/uploads/2020/06/clip_image0064.jpg "clip_image006[4]")

![clip_image008[4]](https://monitoringguys.com/wp-content/uploads/2020/06/clip_image0084.jpg "clip_image008[4]")
Open Certification Authority from Server Manager


Test the web enrollment site…


Make sure you have an appropriate template for use with SCOM clients

Find the Computer template, right click it and select Duplicate Template.
(I borrowed a few of these screenshots and text from BILLY YORK. Saved me a bit of copy/paste.)
![clip_image002[7]](http://4.bp.blogspot.com/-dha6eLQ4cJE/VSPvu6FJgjI/AAAAAAAAA1w/xhOx6GAn57c/s1600/2015-03-10_8-25-32.png "clip_image002[7]")
In the Properties of New Template on the Compatibility make sure Show Resulting changes is checked, Certification Authority is Windows Server 2003 and Certificate Recipient is Windows XP/Server 2003.
Note: at the time that this screenshot was taken, these operating system versions were basically the lowest common denominator in my lab environment. Do what is appropriate for your environment.
![clip_image004[6]](https://monitoringguys.com/wp-content/uploads/2020/06/clip_image0046.jpg "clip_image004[6]")
Under the General tab, give the Template a Name and set the Validity period to something appropriate for your use.
![clip_image006[6]](http://3.bp.blogspot.com/-ZY99WdNARdg/VSPvvc791eI/AAAAAAAAA10/EmIJtYe4_IY/s1600/2015-03-10_8-26-19.png "clip_image006[6]")
On the Request Handling tab, make sure Purpose is set to Signature and encryption and check Allow private keys to be exported.
*Why “allow private keys to be exported”? The target machine will likely not have access to the certificate server because it’s not trusted which is likely why you need to create a certificate in the first place. This procedure is meant to be performed on a trusted machine with access to the certificate request site/URL (which is likely not possible from the intended target machine), then exported, then imported on the intended target machine.
If you don’t want to allow the private key to be exportable, the alternative is to allow the untrusted intended target server access to the certificate authority request website to download and import the client certificate directly.
![clip_image008[6]](http://3.bp.blogspot.com/-XVGYQfyWm8U/VSPvvsk3-fI/AAAAAAAAA14/OMeQ5zCt0Q4/s1600/2015-03-10_8-26-50.png "clip_image008[6]")
On the Cryptography tab check Microsoft Enhanced Cryptographic Provider 1.0 and Microsoft RSA SChannel Cryptographic Provider.
![clip_image010[4]](http://1.bp.blogspot.com/-p5O08XK0_aA/VSPvv2h0Z9I/AAAAAAAAA18/ahACoORjmZY/s1600/2015-03-10_8-27-20.png "clip_image010[4]")
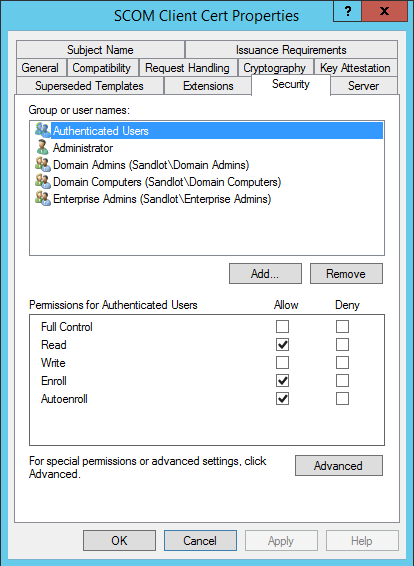
On the Authentication tab, give Authenticated Users Enroll.
![clip_image012[4]](https://monitoringguys.com/wp-content/uploads/2020/06/clip_image0124.jpg "clip_image012[4]")
On the Extensions tab, under Application Policies make sure Client Authentication and Server Authentication are there.
![clip_image014[4]](http://2.bp.blogspot.com/-2Kc5jpAe6MI/VSPvwdNBTEI/AAAAAAAAA2E/--Fk4OHSG_Q/s1600/2015-03-10_8-28-16.png "clip_image014[4]")
On Key Usage make sure Digital Signature is checked.

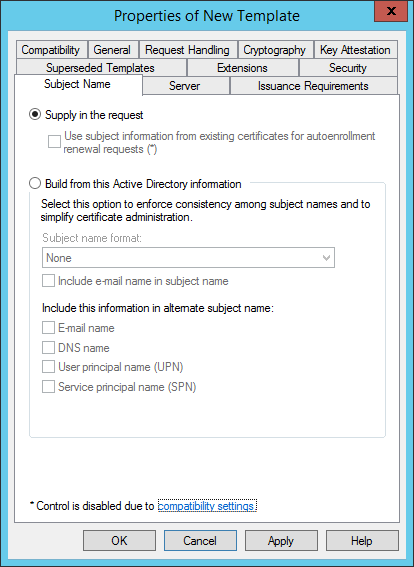
On the Subject Name tab, select Supply in the request.

Click Apply and OK to save the template.
Next, right click on the Certificate Template and select New -> Certificate Template to Issue

Then select our newly created SCOM Client Cert.
![clip_image002[9]](http://2.bp.blogspot.com/-ilgSsyNlpzg/VSPvxb0iygI/AAAAAAAAA2Y/30-jkFKZ10U/s1600/2015-03-10_8-30-17.png "clip_image002[9]")
Template now appears in the web enrollment dropdown list.

One Reply on “Install Root Certificate Authority (Standalone) Windows Server 2016, Create SCOM Certificate Template”